Constructing An Embedded Animation In A NIF
This article draws heavily from Pixelhate's guide on object animation, and it would not be possible without his research. Please, if you found this article useful, give him a kudos and download his guide.
NIFs can contain multiple animation sequences that can be called with PlayGroup, however they require a specific setup in order to function correctly. This article will detail how to create a simple opening and closing sequences for a door as an example, but the structure is universal for all independent NIF animations.
Contents
1. Prepping the NIF
This guide will provide tweaked versions of Pixelhate's example NIFs for you to work off of.
Above is a NIF that shows off the following:
- A separated doorframe and door, each with their own NiCollisionObjects.
- Named Nodes and NiGeometry blocks for the sake of easy comprehension.
- A BSXFlags block on the root Node with "Bit 1: Havok" and "Bit 3: Complex" ticked.
It is best practice to make sure all of your NiGeometry blocks have applied transforms, as transforms can displace the object's actual origin and cause it to be culled while in view. In this example, "DoorFrame:0" is rotated 180 degrees. Right-click it in the Block List, go down to Transforms, and hit Apply to set the transform.
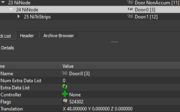
After that is done, we will be adding a NonAccum NiNode to the root Node and reparenting the Door Node to it.
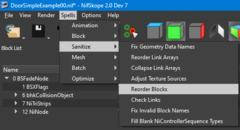
To do this, open the Children dropdown list on the Root Node, doubleclick the text saying "Door:0", and hit backspace to unlink the Node. Next, click the green + on the now empty link, and click NiNode on the new menu. This will add a new NiNode. On this new NiNode, right-click the field next to name, and click "Edit String Index" and enter "Door NonAccum" to name the Node. Then, change Flags to 524302, and change "Num Children" to 1. Click the green arrows below it to update the list of Children, and enter the number of the "Door:0" Node in the empty link in the dropdown menu. The structure is finished after you hit "Spells>Sanitize>Reorder Blocks" in the toolbar at the top of the window.
2. Creating the NiControllerManager
NiControllerManager is a block that manages all of the animation sequences in a NIF, and is required if you need multiple animation sequences.
To start building, select the Root Node, click the green + next to Controller, select "NiC...>NiControllerManager" to add it to the Root Node, and then set Flags to 76 (this sets it to Clamp/play once).
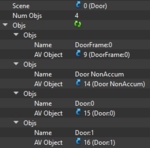
Next, click the green + next to Object Palette to create a NiDefaultAVObjectPalette. This block is a lookup table of all of the animated Nodes and blocks in the NIF, and is required for animation sequences to work. Set the value of "Num Objs" to match the number of Nodes (minus the Root Node) and NiGeometry blocks in the NIF (in this case, excluding the Root Node, it is 4).
Click the green arrows to update the Objs list, and set the Scene field to 0 to point at the Root Node. Then go into each Objs and populate AV Objects with the Nodes and NiGeometry blocks, and make sure the Name field is an exact match to the linked Node/block's name.
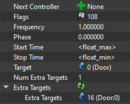
After this, we will add a NiMultiTargetTransformController block. This block targets multiple Nodes and blocks in the NIF for animation. On NiControllerManager, click the green + on Next Controller and select NiMultiTargetTransformController.
On that new block, change flags to 108 (this sets it to Clamp), then change Num Extra Targets to 1, update the list, and add the Node index number for Door:0. (If the singular Target is not set to 0/the Root Node, set it to that now.)
3. Creating a NiControllerSequence
An animation sequence consists of at least four parts. A NiControllerSequence, the sequence itself, a NiTextKeyExtraData, the timing data, some form of NiInterpolator, to interpolate data, and its related data block. In this case, a NiTransformInterpolator and NiTransformData.
Start by editing the flags on BSXFlags. Go to it and click on the flags icon next to Integer Data. Tick "Bit 0: Animated" and hit accept. Then, go to the NiControllerManager, set Num Controller Sequences to 2, update the list, expand it, and click the first green + in the list. Set Cycle Type to CYCLE_CLAMP, Start Time to 0.000000, and End Time to 1.000000, Manager to the index number of the NiControllerManager, and right-click Accum Root Name, hit Edit String Index, and name it to the same name as the Root Node. (In this case, it should pop up as "Door [0]" if you did it correctly.)
Next, change Num Controlled Blocks to 1, update the list, and expand both lists in Controlled Blocks. Edit Node Name to match the name of the Node that you want to directly animate (in this case, Door:0) and edit Controller Type to NiTransformController.
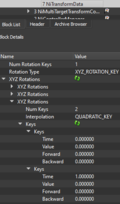
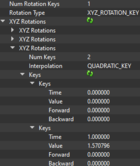
Click on the green + next to Interpolator, add a NiTransformInterpolator, then click the green + next to Data to add the NiTransformData. Set Num Rotation Keys to 1, and set Rotation Type to XYZ_ROTATION_KEY, and update the list. Expand the XYZ Rotations list and each submenu, and set Num Keys to 2 and the Interpolation to QUADRATIC_KEY on all three.
Each XYZ Rotation now contains a start and end key for individual X, Y, and Z rotations. Expand each Key list, and set each Rotation's second Key Time value to 1. This sets the end time to one second.
After that is done, go back up to the NiControllerSequence and click the green + next to Text Keys to add a NiTextKeyExtraData. Set Num Text Keys to 3 and update the list. You will get three Time values alongside a Value field for a string. Edit String Index to name the first Value "Start", and the last Value as "End" and set its Time value to 1.000000. The middle key is for playing a named Sound form at the specified time and we will add it later.
The sequence itself is fully structured at this point, although it lacks the actual transform data. We will add it after cloning the sequence to save time on having to build a closing sequence from scratch. To do this, click the NiControllerSequence and press CTRL+C. Select NiControllerManager, go down to Controller Sequences, select the empty link below the NiControllerSequence, and press CRTL+V to paste the sequence. Finally, go into both sequences and set Controller to the index number of the NiMultiTargetTransformController.
Select the first sequence, and Edit String Index on the Name field, and name it "Open", and do the same with the second sequence, naming it "Close" instead. Capitalization isn't required in this instance, but PlayGroup requires sequences to be capitalized. You should Reorder Blocks after this.
4. Adjusting For Rotation & Collision Tweaking
The NiControllerManager and its sequences are properly set up at this point, but animating the door as is would not look correct as it is centered to the NIF's origin. We need to offset it so it can rotate from an edge. You could do this in a 3D modeling program like Blender or 3ds Max, but for the sake of an all-contained guide, we will show how to do this in NifSkope.
Select the NiNode named Door:0 and go down to Translation. Set the X value to 48.000000. This should move the NiNode's position into the door frame. Select the NiTriStrips called Door:1 and do the same, this time with -48.000000. The door should move back into a centered position. Then go up to the NiTransformInterpolators and set the X Translation value to 48.000000.
Next, update the collision settings on the door. Expand Door:1 and select the bhkCollisionObject under it. Open the drop down list on Flags and tick SET_LOCAL and USE_VEL. This will allow the door to push items and actors while opening/closing.
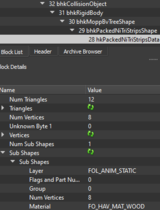
Expand bhkCollisionObject, go to bhkRigidBody, and set FOL_STATIC to FOL_ANIM_STATIC on Layer and the Layer under Havok Filter Copy. Keep expanding the list under bhkRigidBody until you get to hkPackedNiTriStripsData, and open Sub Shapes. Set Layer to FOL_ANIM_STATIC as well.
Then, go back up to bhkRigidBody. Scroll down to the bottom, and set Motion System to MO_SYS_KEYFRAMED, Deactivator Type to DEACTIVATOR_SPACIAL, Solver Deactivation to SOLVER_DEACTIVATION_LOW, and Quality Type to MO_QUAL_KEYFRAMED.
5. Final Steps
Now that everything is set up, it's time to add the animation data.
Go to the NiTransformData under the Open sequence, and go down to the last set of keys, which represent Z rotations. Open the second key, and set the Value to 1.570796, which equates to a 90° rotation in Radians. On the Close sequence, set the Value of the first key to 1.570796 so that the Close sequence starts at a 90° rotation and goes to back to 0°.
Finally, go back to the NiTextKeyExtraDatas and add an appropriate Sound Form EditorID to the middle keys at a Time of 0.000010. For example, "Sound: DRSWoodOfficeSingle01Open" for the Open sequence and "Sound: DRSWoodOfficeSingle01Close" for the Close sequence.
Your results should match this if you did things correctly. You can test the animations with the animation player in the upper right of NifSkope.
6. Original Credits
This is taken verbatim from Pixelhate's original doc.
Gratitude to Prensa for her help, for all the information shared, for her friendship and support through years. I miss you greatly.
- This tutorial is inspired by the one written by TrickyVein in May 2013 on Nexus under the title: Tutorial: Working with the NiControllerManager, may he be thanked for sharing it. [1]
- The Bits of NifSkopery series will give you an overview of the nif structure and settings. [2] Or [3]
- If you’d like to learn about Texture and Material animations, check the Material & Texture Animation with NifSkope guide. [4]
- My admiration to the over talented Wizards in the Secret Discord server.
- Respect to all the Tutorial Writers.
- Thanks to all to People answering questions on Forums.
Pixelhate. 2023.

