Bethsoft Tutorial Finalize and Connect
Contents
Overview
In this tutorial we will learn how to attach Vault 74 to the Wasteland. This will connect it to the game and make your level ready to share with others without the need to use in-game console commands to access the new content.
Working in the Wasteland
The first thing we need to do is find a good spot to place our Vault Entrance. This means we need to visit the Wasteland.
To get into the "Wasteland" worldspace we need to select it from the "World Space" drop down box in the "Cell View" window.

The fastest way to get to the "Wasteland" worldspace is to click the drop down and hit "End" on they keyboard.
Once selected find "Vault101Exterior" in the Cell List and double click it. This will put you directly over the Exterior Entrance to Vault 101.
Remember to hit "A" if your Render Window is running to slow because of lighting.
Navigating the 3D Camera in a Worldspace is the same as navigating in a Interior. Select an object, then pan, rotate, and zoom your way around the landscape.
Hit "B" to toggle the "Cell Borders". "Exterior Cells" are not the same as "Interior Cells". An "Interior Cell" is connected to other cells by teleport doors. "Exterior Cells" are the 4000 unit grids that make up a Worldspace, and you cannot load/view multiple interior cells at one time.
Setting up our Vault 74 Exterior Entrance
Let's pick a spot close to Vault 101. This way it's easy to get to if you share it with a friend. So, navigate one cell North from "Vault101Exterior". The arrow keys are useful for quickly navigating exteriors from the top-down view.
You may need to toggle "Allow Render Window Cell Loads" on from File>Preferences>Render Window to automatically load exterior cells. You may also wish to toggle this option off when working within a specific cell, to avoid accidentally loading an adjacent cell while you work.
Remember that hitting "T" with an object selected centers your view over the selected object. Once you are centered you can see which direction is North (Up). The NorthMarker object has no effect in exterior cells.
You should now be in cell "Wilderness (-4,-3)" as can be seen in the "Cell View" window above the objects list. You can rename the cell the same way you rename an "Interior Cell". This makes it easier to find in the "Cell List".
The GECK also features new X/Y coordinate input fields to quickly load any cell, pictured in Fig 1a below. Enter the coordinates of the cell you wish to load in the current worldspace and choose "Go".
Select "*All" in the "Object Window" and use the "Filter" text box to type "CanyonCavesEntrance". Drag in the "CanyonCavesEntrance03A" piece. Also drag in the "CanyonCavesEntrance03B" piece. Position them, using Fig 1c as a guide.

Fig 1a: The X/Y input fields in the Cell View Window
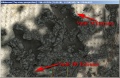
Fig 1b: Top-down reference of Vault locations
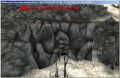
Fig 1c: Location of Vault 74


You can also "Toggle Sky" on and off with thebutton. This enables the fog, and also sets the time of day with can be customized in the "Preferences Window". This button is also used in "Interior Cells" to enable the fog.
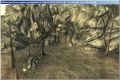
Now that we have our cave put where we want it let's patch up the holes with some other cliff pieces. Using two "CliffCanyonL03rad1283" pieces, patch up both sides of the cave entrance piece. If you have any trouble patching up some spots, or accidentally creating other holes, you can use smaller rock pieces to path those up. Some of the trees can be deleted if your cliff pieces clip into them. You should also drop a "CaveDoor01" into the cave entrance.
Your cave door will not quite fit in the frame. Use "S" and drag the door to scale it up slightly so that it fits a little better.
Here is what your cave entrance should look like now.
Vault 74 Cave Entrance

To make this cell easier to find you may want to rename it. Click on your door (to see which cell it's in), then click the selected cell (probably "Wasteland (-4,-3)"), hit "F2", and rename it to "Vault74Exterior".
Connecting to Vault 74
Now that we have placed our entrance, including the door, it's time to connect it to the Vault74a interior cell we've been working on. This will allow the player to use the doors and move between both spaces.
Connecting the Doors
First, double-click on the exterior cave door. Once the "Reference" window comes up click the "Teleport" checkbox, as shown in Fig 2a.
Now that we've set this door up to teleport we need to load into the "Vault74a" cell.
Keep the "Reference" window open for the exterior door. If it's in the way just drag it to the side. Now, make sure the "World Space" drop down box has "Interiors" selected.
The fastest way to get to "Interiors" in the drop down is to click the drop down, then hit the "Spacebar" or "Home".
Once you've got "Interiors" selected, load "Vault74a" in the cell list. Locate the cave door we want to connect to the Wasteland. Double-click to open its Reference Properties, check the "Teleport" box, and choose "Select Reference in Render Window", as shown in Fig 2a.
It is also possible to choose a load door with the Cell drop-down list, but this is only useful if the door you wish to connect to is in a cell with a meaningful name.
Move your mouse over the Render Window and notice that the cursor has switched to a red crosshair (a white crosshair when it's over a door). Double-Click on the door. You will notice a yellow marker appear inside of the door. Select the marker and move/rotate it so that it faces away from the door and is not intersecting any geometry. This is where the player will be moved to when entering this cell from that exterior door. Close "Reference" window for the exterior door by hitting "OK".
Make sure marker geometry is toggled on with the "M" hotkey, or you will not be able to see your yellow teleport marker.
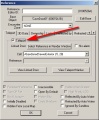
Fig 2a: Click "Teleport" in the cave doors "Reference" window
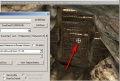
Fig 2b: Selecting the interior cave door as the teleport target


Double-click your newly-positioned teleport marker. You will be prompted to load the connected door; choose "Yes". Once the Vault 74 exterior cell has loaded, select the connected door. Move/Rotate this marker to make sure the player will face away from the Vault door and is not intersecting the ground or any other geometry.
An easy way to make sure things are set on the ground is to move them slightly off the ground/floor and hit the "F" key, this will drop them to the floor. The "G" hotkey is another new GECK feature, which moves objects up at very small increments.
The entrance to our Vault is now able accessible to the player, but only the player. Creatures and NPCs will need the help of the navmesh to use this door.
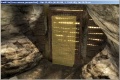
Fig 3a: New Teleport Markers often appear inside other geometry or facing the wrong direction.

Fig 3b: A properly positioned teleport marker.
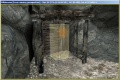
FIg 3c: Do the same with the exterior door marker


Enable the Navmesh by pressing the ![]() button. Once it is enabled press "W", or the
button. Once it is enabled press "W", or the ![]() button and your view should be similar to that in fig 4a.
button and your view should be similar to that in fig 4a.
Navmeshing in a Worldspace is not much different from Navmeshing in an Interior. The only real difference is the cell borders. You must make sure that the cell borders have the connecting navmesh aligned as close as possible. Keep this in mind while we tweak the navmesh around our entrance.
Compare Fig 4a to fig 4b, noticing the tweaks near the door. I've modified the navmesh to match the new rocks and door we've placed. Remember that creatures and NPCs won't realize there are rocks over the navmesh and will try to use those areas when pathing, which can lead to AI bugs in the game.
Those bright green borders around the cell borders are important. You may notice that some of them were "broken" in the course of modifying the navmesh. We'll cover them momentarily.

Fig 4a: Exterior Cave Door with Navmesh enabled
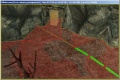
Fig 4b: Tweaked Navmesh around cave door


The final step when working with any navmesh is "Finalizing". "Finalizing" in a Worldpsace will only Finalize the cell that is currently loaded, so make sure you have the cell containing the teleport door loaded. You can verify the currently loaded cell by checking which cell is listed in the Cell View window, as noted in fig 5a.
Enable navmesh and use the "Find Cover Edges" ![]() button. Once that's finished use the "Finalize Current Cell's Navmeshes"
button. Once that's finished use the "Finalize Current Cell's Navmeshes" ![]() button. All of the edges should now be highlighted in green. This means they are connected to the adjoining Navmeshes Edges and that the AI can navigate between these cells.
button. All of the edges should now be highlighted in green. This means they are connected to the adjoining Navmeshes Edges and that the AI can navigate between these cells.
If there are any edges that don't highlight green just tweak them a little more to make sure they are aligned perfectly then re-finalize the Navmesh in that cell.
Fig 5b shows what your cave entrance should look like. Notice the colored triangle beneath the door marker. Like the green borders, this tells AI that it can path from this place to another spot. In this case, the colored navmesh triangle connects interior and exterior doors.
Load "Vault74a" and verify that finalization created a teleport triangle in this navmesh, too. Finalize the interior navmesh in the same way if not.
Now you have all the knowledge needed to create and flesh out a Vault you can share with friends and the online mod community. Let's take it one step further and create a very simple quest to accompany your work.
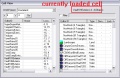
Fig 5a: Checking what cell is currently loaded
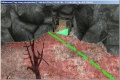
Fig 5b: Finalized Exterior Navmesh
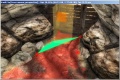
Fig 5c: Finalized Interior Navmesh


