Bethsoft Tutorial NPC population
Contents
Overview
This tutorial will cover the basic placement of leveled lists for enemy spawning and the use of generic patrol and sandbox package behaviors.
This tutorial assumes you are working in a fully-navmeshed location. You can download and work with the example plugin from the previous tutorial if necessary.
About The New Leveling System
Some users may be familiar with the leveling system employed in TES4: Oblivion. While built upon the same foundation, there are some key differences that should be understood.
- Encounter_Zone - Encounter Zones allow designers to create a minimum difficulty level for an area. For instance, if a second-level player enters an Encounter Zone with a min. level of 10, leveled lists in the Zone will spawn actors as though the player were level 10.
- No Recalculation - When the player enters an encounter zone for the first time, the level of that zone is set permanently. This means that once a player enters an interior, actors generated by leveled lists within will never reset or increase in difficulty.
- Thin Leveled Lists - Unlike Oblivion, most leveled lists in Fallout 3 are populated by very few tiers of enemies. By way of example, let's look at the lvlMirelurk leveled list. Notice that there are only three types of Mirelurk Creatures the list is able to pull from. These Creature stats will not fluctuate based on the player's level. Jumps in enemy difficulty are clear both visually and statistically.
Level Creature Name Creature ID 1 Mirelurk CrMirelurk1 9 Mirelurk Hunter CrMirelurk2 16 Mirelurk King CrMirelurk3King Because of this, although the Encounter Zone may be looking for a level ten creature, it will pull the level nine Mirelurk Hunter, as that is the closest match.
Adding A Basic NPC
NPC Patrols Tutorial Video at YouTube
Rather than creating and placing unique, specific radiers for every enemy, we use leveled list objects to place our hostile NPCs. Leveled lists, in short, randomly spawn one of a pre-determined list of enemies, based on a combination of the player's current level and the Encounter_Zone associated with the cell.
Placing a Leveled NPC Marker
We will primarily be using lvlRaiderGun, which spawns a raider with a gun. We don't care much about the specific type of gun, or about the raider's armor, gender, or other ancillary details. You can locate this object via filtering or by navigating manually to Actors>NPC in the Object Window list.
Once you've located lvlRaiderGun, drag a new reference into the Render Window. The new marker will appear as a white M with an arrow through it, as pictured below.
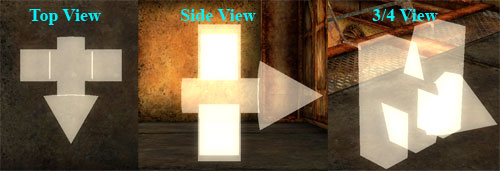 3 Views Of A Leveled List Marker with no difficulty modifier
Difficulty modifiers are used to set relative difficulty to the Encounter Zone level. The marker we just placed is using the default "None", so let's change it to "Easy". To change the difficulty modifier , double-click on the marker and go to the Leveled Actor Tab. In the tab, maneuver to the Level Modifier drop down and select Easy. Press OK to finalize the change.
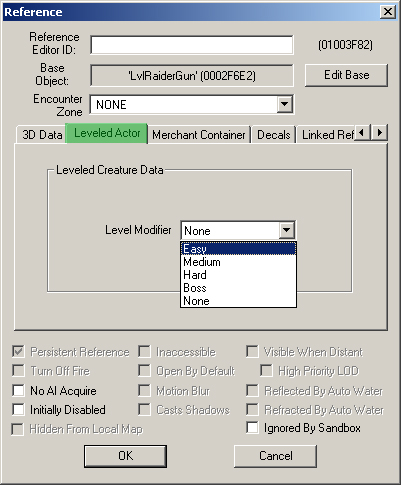 The Leveled Actor Tab
The Easy difficulty modifier is special, as it will choose any actor in the leveled list considered easy. This goes a long way towards enemy variety, particularly for high-level players. A good rule of thumb is to set around 50% of leveled lists in an area to "Easy". Read here For more information on difficulty modifiers.
After changing the difficulty modifier to Easy, you'll notice that the color of the marker is now green. Each difficulty is represented by a different color so you can gauge an area's difficulty pacing with a glance. The color of the marker is assigned based on the difficulty level set.
Diff. Modifier Marker Color None White Easy Green Medium Yellow Hard Orange Boss Red 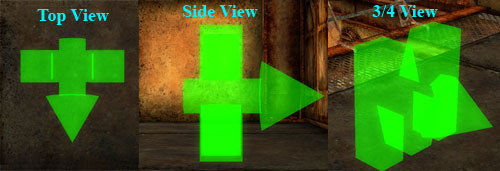 3 Views Of A Leveled List Marker Set To Easy
Now that we've placed our first leveled list in Vault 74, we can concern ourselves with how that raider is going to behave when spawned.
NPC Behavior
NPC behaviors are driven primarily by "AI Packages", which are highly customizable sets of goals and tasks. While packages can be used to create fairly robust behavior, they can also be very time-consuming to create and customize.
The GECK introduces new features which allow us to quickly assign behavior to NPCs like these raiders. These are the generic patrol and sandbox package behaviors. Thanks to generic packages, which are included by default on most basic enemy leveled lists, we're able to set up simple behaviors without ever having to manually edit a pacakage.
For advanced information on customizing NPC behavior, follow the links below:
Creating A Patrol
A patrol is a set of linked markers placed in the world. An NPC on patrol will move along that route until interrupted by combat or another AI command. Patrol waypoints can be customized to include information such animations to play or a time to wait before moving on.
Linking References
For our basic patrol, we will need an NPC and the series of points that they will patrol between. To set the patrol route we're going to place a series of "xMarkerHeading" in the world and then connect them sequentially. First, we'll need to grab an "xMarkerHeading" marker from the Object Window (via filter or found under World Objects>Static) and place it near the lvlRaiderGun we created above.
The lvlRaiderGun marker does not count as a point in the patrol. The markers that you are using to create the route should connect to each other. The NPC can be linked to any one of the markers in the patrol route, and will begin patrolling at the closest point when spawned.
You may have noticed an object called "xMarker" in the Object List. The only difference between this and an "xMarkerHeading" is the display graphic. The latter is generally preferred as an NPC destination because the triangular protrusion on the front of the rectangle represents the direction an NPC will face when standing at that location.
Now that we've got a point and our raider, its time to link the two together. Start by double clicking on the lvlRaiderGun marker and go to the "Linked Ref" tab in the "Reference Properties" dialog. Click "Select Reference in Render Window" button. The dialog will minimize and the cursor will turn into this circular crosshair:

Next, mouse over the xMarkerHeading. Your cursor should change white.
Double click to select, and the Reference Properties dialog will return. Note that the XMarkerHeading is now in the Reference field, and Vault74a is in the Cell field, press OK. When selected, linked references display a thin arrow to illustrate this connection. Select your Leveled List and compare against Fig 1b below.
Non-persistent references cannot be selected, you must make the object a persistent reference first. xMarkers and XmarkerHeadings default to persistent.
To quickly link references, use the hotkey combination "Shift+Q" and double-click on the reference you desire to link the currently selected object to.
With our first patrol waypoint linked, we'll want to tell the raider how long to stall here before moving on. To do so, double-click on the xMarkerHeading we placed and set how long we want the raider to remain at the point during their patrol.
Double click on the xMarkerHeading marker to open the Reference Properties. Select the "Patrol Data" tab, pictured in fig. 2c below. Check the Patrol Data checkbox to make the "Idle Time" field available. For this example we'll set a timer of three seconds. Press "OK" to set this data and move on.
Fig 1a: The Linked Ref tab in the Reference Properties Dialog
Fig 1b: Thin arrows indicate a link from an NPC to an xMarkerHeading object (click to enlarge)
Fig 1c: The Patrol Data Tab
Creating A Basic Patrol
Patrols inherently need at least two points, so let's create a few more xMarkerHeading objects and link them together. The NPC can be linked to any point in the patrol route so we can leave that alone for now.
Patrol Data persists on duplicates, so it saves time to set your first marker up and duplicate that with "Ctrl+D", rather than dragging out new objects every time.
Create three more xMarkerHeading objects in the area you'd like this raider to patrol. Using the same process by which we linked the lvlRaiderGun to our first xMarkerHeading, link each new xMarkerHeading to the previous. When selected, your leveled list and four markers should display a thin line of arrows linking them all in a sort of chain.
This patrol, which should mimic fig 2a below, is a "ping-pong" patrol. By leaving the first and last points of the patrol unconnected, the raider will walk from the first point to the fourth point and then walk the patrol in reverse.
If we had linked the first point to the last point, the patrol would become a complete circle and go from the first point to the fourth point and then straight back to the first point. Fig 2b is an example of a basic four point circular patrol.
Fig 2a: Four point "ping-pong" patrol, which runs: 1>2>3>4>3>2>1
Fig 2b: Four point "circular" patrol, which runs: 1>2>3>4>1
Creating A Patrol Using Idle Markers
In the current arrangement, our NPC will pause at each xMarkerHeading and stand in place until the idle timer runs out. We can liven up our patrols a bit by using "Idle Markers", instead of xMarkerHeading's. When we substitute an idle marker for an xMarkerHeading, the raider will play one of the animations listed in the marker when they hit the point, instead of just standing around.
To view a list of preset idle markers, navigate to Miscellaneous>Idle Marker' in the Object Window, as pictured in fig 3a. You may want to enter the prefix "default" in the filter field to hide idle markers created for specific applications.
Use idle markers that correspond to the appropriate NPC/creature type, since not every NPC can do every animation. For example, a deathclaw has unique animations, so we'd use a DeathClawIdleMarker instead.
One important caveat when working with Idle Markers: they are not persistent references by default. To link them in a patrol, you must mark them as persistent first. To do this double click on the idle marker to open the Reference Properties dialog and mark the Persistent Reference checkbox at the bottom. Refer to fig 3b below if you're having trouble locating it.
Once you have the checkbox marked and the marker is persistent, you can just link it like we did above with the xMarkerHeading markers. Fig 3b below is an example from the provided plugin of a patrol setup exclusively using idle markers.
There's no point in using an Idle Marker on a patrol unless you set an idle time long enough for the NPC/creature to choose and play an animation. When you just want to make sure your patrol passes through a specific point and don't want a pause there, use an xMarkerHeading with no idle timer.
Fig 3a: Locating Idle Markers in the Object List
Fig 3b: Persistent Reference Checkbox
Fib 3c: An example patrol using idleMarkers
Setting Up A Sandbox
The raider we placed has another default behavior we can employ; the sandbox behavior.
Sandbox behavior is a basic package that tells the NPC to wander the designated area and interact with any eligible objects nearby. For the main room of our plugin, lets add two raiders on sandbox packages.
Create a new (or duplicate your existing) lvlRaiderGun in your space. For a change of pace, let's add a "lvlRaiderMelee" as our second. LvlRaiderMelee is exactly like lvlRaiderGun except that it only spawns melee characters.
When placing groups of multiple enemies, it's often a good idea to add one melee-specific enemy. The combination of melee and ranged enemies creates a situation in which the player needs to use the environment intelligently.
Most NPC leveled lists have several weapon variations. The most common are Melee, Gun and Special. Leveled lists with the 'Special' tag usually generate an NPC with a flamethrower, missile launcher or minigun.
So long as we dont link the raiders to anything, they will default to their sandbox package. Without furniture or idle markers to interact with, however, your NPC will simply wander the area or stand around doing nothing.
Let's add some furniture markers to the area in which the raiders will be walking around. Fig 4b below shows some furniture objects that we can use. These are: PushUpsMarker, ChairVault01R, WallMarker, and Microscope01, though there are others you can experiment with.
The blue character in the furniture marker mimics the animation pose NPCs will play when using it. This makes it easier to line up things like the wall lean and animations that interact with surfaces/objects. If you cannot see these markers, press "M" to toggle marker geometry.
When a piece of furniture displays more than one blue character marker, you're seeing an entry point. ChairVault01R, for instance, needs to be placed with a clear, navmeshed area under the standing character marker, because this is the side from which NPCs will try to get into the chair object.
If a furniture marker has a visible object in it, that object will appear in-game. For example, placing the above chair furniture marker will also place the chair in the world so you wont have to place one yourself. The white markers and blue characters will not show up in-game, they just help line things up.
Setting up a sandbox is as simple as placing the markers around the area. While the raiders are wandering, they will interact with any suitable object within 512 units of their current location. Fig 4c is an example of the galley room set up with the two raiders and the above mentioned furniture markers.
Fig 4a: Location Of Furniture Markers In The Editor
Fig 4b: Examples Of Furniture Markers
Fig 4c: Vault 74 w/sandbox furniture placed
NPCs will also interact with idle markers in the areas that they sandbox. The same rules apply, including the default radius of 512 units in which they'll search for objects.
The next tutorial in this series will be cover how to populate Vault 74 with Non-NPC elements such as traps, locked doors and turrets.


