Bethsoft Tutorial Basic Quest
Contents
Quest Logic Primer
Quests help the player keep track of objectives, guide experiences, and offer tangible goals and rewards. They can also get very complex, especially in a game like Fallout 3. We'll dip our toes in the shallow end of this pond by creating a very basic quest for Vault 74.
While fully-fledged quests can get very complex, most boil down to a sort of flowchart. Events within the quest structure are referred to as stages.
Creating A Simple Quest
Quests can be found in the Object Window under Actor Data>Quest. Right-Click in this list and select "new" to create a quest from scratch. The Quest dialog has a lot of tabs and fields, but we're only concerned with the following right now:
- Quest Name - Exploring Vault 74
- ID - VT74
- Priority - 50
- Start Game Enabled - Check this box
Press OK to save. We've just created the basic shell of the quest. The quest doesn't do anything yet, though. Let's plug in the basic stages.
The "OK" button is the best way to save quests. Quest data will also be saved when you switch tabs in the quest window.
Quest Stages
Stages are the basic framework for a quest. Our quest will consist of only two stages, and will look something like this:
| Stage | Objective | Note |
|---|---|---|
| 10 | Search the Vault 74 Overseer's Office | Quest start - player enters Vault 74 |
| 100 | Player has explored Vault 74 |
Fully-fledged quests are obviously much more complicated than this, but this two-stage quest is more than enough to teach us the basics of quest design in the GECK.
Re-Open the "VT74" quest we just created. Open the "Quest Stages" tab. There are no stages here, so let's go ahead and create our two stages now. Right-click in the "index" column on the left side of the Quest Dialog. Select "new" from the pop-up menu. Enter "10" as the Stage Index. Repeat this process to create stage "100".
Stage 10 will be our initial stage, and 100 is our ending stage. This leaves plenty of empty space for any stages we decide to create later, which isn't uncommon with complex quests.
Let's create a basic objective for stage 10 now. We're going to automatically start this quest when the player enters Vault 74, and we just want to give the player an objective which encourages exploration.
Change to the "Quest Objectives Tab". Right-Click to create a new objective at the top of the dialog. Enter an index of 10 and the Display Text: "Explore the Vault 74 Overseer's Office".
We want this Objective to accompany Stage 10, so go back to the "Quest Stages" tab and select Stage 10. Right-click under "Quest Stage Items" to create a new stage item. Leave the log entry field blank, but add a result script. Add "SetObjectiveDisplayed VT74 10 1" to the result script field.
We also need to add a stage item to Stage 100. Leave this one blank, but check the "Complete Quest" checkbox. We'll use this later.
Result Scripts allow designers to write small scripts that automatically fire when a quest stage is set.
Basic Scripting for Quest
For this example we want the quest to start automatically when the player enters Vault 74. To do that, we're going to have to learn how to create a basic scripted trigger.
Trigger Script
The GECK introduces the ability to set text/background preferences from Edit>Preferences in the script toolbar.
To begin, let's open a new, blank script. Click the ![]() Script button in the Main Toolbar. A blank Script window will appear. From the toolbar, choose Script>New to create a new, empty script. Let's write the following script:
Script button in the Main Toolbar. A blank Script window will appear. From the toolbar, choose Script>New to create a new, empty script. Let's write the following script:
scn VT74stage10triggerSCRIPT

begin onTriggerEnter player

   if getStage VT74 < 10
      setStage VT74 10
   endif

end
What's all that mean? Let's break it down line-by-line.
- scn - This is shorthand for Scriptname. Just as we have to give any new base ID a unique name, this is the unique ID of this script - in this case "VT74stage10triggerSCRIPT"
- begin onTriggerEnter player - this begins an "onTriggerEnter" block. Blocktypes give scripters a number of ways to capture game events. In this case, we're going to capture when the player steps into a trigger we'll be creating soon. The optional "player" parameter let's us specify that we only care when the player enters this trigger.
- if GetStage VT74 < 10 - This is an "if statement", a common element in programming logic. Here we're checking to see if the current stage of our Quest (VT74) is less than 10. We know that the first time the player enters this trigger, this statement "getStage VT74<10" will be true, because stage 10 hasn't been set. Once we set VT74's stage to 10 or higher, the statement "getStage VT74<10" will be false, meaning any script between this "if" and the next "endif" will be skipped over.
- setStage VT74 10 - This script command sets the stage of VT74 to 10. We know that this will give the player the quest objective we've already created, and means that any time the player hits this trigger in the future, the previous "if" statement will be false, preventing this line of script from running again.
- endif - This closes the preceding "if" statement, and tells the script where to resume if the if check was false.
- end - This closes the onTriggerEnter block
Though we don't use them in this example, "comments" are good practice when scripting. To make a comment, simply enter a semicolon (";") character on any line of a script. The game will ignore anything behind a semicolon, allowing you to make notes. Comments are indispensable when your work may be shared by others, and are valuable as a way to keep notes for yourself.
Creating our Scripted Trigger
Save and close this window. Now that we've got a functional script, we just need to attach it to a trigger object in the world. Click the Trigger Primitive ![]() button in the Main Toolbar. (Click here if you haven't learned how to create primitives yet.) Draw a new trigger near the entrance of Vault 74.
button in the Main Toolbar. (Click here if you haven't learned how to create primitives yet.) Draw a new trigger near the entrance of Vault 74.
If you still have Portals and Rooms visible from the optimization tutorial, you should navigate to View>Show/Hide Window from the Main Toolbar and hide them now.
Once you complete drawing the trigger, the "Activator" dialog will appear. Be sure you enter the following:
- New - To indicate that this is a new trigger activator
- ID - VT74stage10TRIG
- Name - Blank
- Script - VT74stage10triggerSCRIPT
Press OK to complete. You can now load this plugin in the game and when you enter the trigger the new quest and objective will be added to the Pip-Boy quests tab.

Ending the Quest
Quest Targets
We've given the player a fairly vague Quest Objective, so let's provide a little extra guidance in the form of a "Quest Target". Quest Targets can be any object that has a physical location. For our example, let's create a holotape the player can recover in the Overseer's Office and point to that.
Holotapes are a great way to tell some backstory when they add Notes to the Pip-Boy. Let's create a note now.
Since we want this note to appear in the world as a holotape object, let's duplicate an existing holotape that's already using that art. For this example, open up Vault112Holotape. Be certain you change the ID field, otherwise you'll over-write this original game asset, which isn't what you want to do. By changing the ID, you'll be prompted to create a new object.
Fill in the following note fields, using Fig 1a as a guide.
- Name - This will appear in the Pip-Boy.
- ID - This is the unique editor ID we'll use in a script.
- Note Type - There are several types of notes you can create. We'll stick with text for this example, as it is the simplest to create.
- Owner Quest - For use when the note is associated with a specific quest, VT74 in our case.
- Note Data - This is the text that the player will be able to read in the Pip-Boy. Go ahead and think of your own backstory for Vault 74 and find some way to express it to the player here. For this example, I'll just throw some vague note in here from the Overseer...
Data Log #10.44.78
The Vault has been breached. There was not enough power to level Five!
God have mercy on our souls.
Click OK to create the new note. You should be prompted to create a new object if you changed the base ID. Choose "Yes" to create our new note.
Let's go ahead and place the note in the Overseer's Office (The Overseer's office is generally the one overlooking the galley, just like the one in Vault 101). Since I haven't cluttered this room yet, I'll place a small table in here, cut that out of the navmesh, and put a small key light on the table to help draw the player's attention to it, as seen in fig 1c. Depending on how you have cluttered and lit your space, do what you deem appropriate to make it stand out.
Next, double-click the placed holotape and make it a "Persistent Reference". We'll need this so we can point to it as a Quest Target.
Re-open your VT74 quest. Return to the "Quest Objectives" tab. Select Objective Index 10 again. Under "Quest Objective Data", right-click and create new. You can either "Select Reference in Render Window" as demonstrated in previous tutorials, or choose the holotape manually in the Cell/Ref drop-down menus. You can set conditions, but since we aren't using multiple quest targets, we don't need to do so.
The player should now have a marker, viewable on the compass and Pip-Boy maps, pointing towards the holotape. Test this out in-game now.
"MoveToQuestTarget" is a useful console command when testing your quest. This will teleport the player directly to the current quest target. You may also want to use "KillAll" to kill any raiders or other enemies.
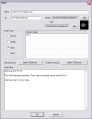
Fig 1a: Creating a new Note
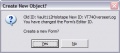
Fig 1b: Prompt to create new
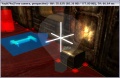
Fig 1c: Placing our Note in Vault74
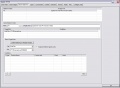
Fig 1d: Making our holotape a Quest Target


Setting the End-Stage
Notes make good quest targets, because they're useful narrative devices to move your quest along. However, unlike many other types of objects, scripts cannot be attached to them. This is troublesome, because we want to end our VT74 quest when the player has acquired the Overseer's holotape.
While other object types could run a script and detect when the player picks it up, we'll have to find another way to detect this event for our holotape. To achieve this, we'll use another trigger. Use the ![]() button and let's create another new script, with the following contents:
button and let's create another new script, with the following contents:
scn VT74EndTRIG

begin OnTrigger player

if getStage VT74 < 100
  if player.getHasNote VT74OverseerLog
    setStage VT74 100
  endif
endif

end
Unlike our previous trigger, this script will run on every frame while the player is within it. This isn't quite as efficient as a trigger that uses the onTriggerEnter or onTriggerLeave block, but we want the quest to update as soon as possible after the player acquires the holotape, so we'll take the hit in this case.
The script logic is otherwise similar to our previous trigger script. Now we need to create another trigger. Again, this is the same procedure as before. We want to surround the Overseer's Office with this trigger, as pictured below. Be sure to create a new Activator and attach the script. Check Fig 2a below to see a good trigger placement. Make sure the trigger lines up on all three axes.
Some users familiar with the Elder Scrolls CS may be tempted to use a quest script and the gameMode block to do this. This trigger, however, is much more efficient. Quest scripts are always running, while this trigger and script only run while Vault74a is loaded. Because we know the player can only acquire the note here, there's no need to use a quest script. Quest scripts also update less frequently; this script will check for the note on every frame the player is within our new trigger.
You can now test your quest in-game. Because we checked "Complete Quest" on Stage 100 of VT74 earlier, you should automatically get a quest completion update when you take the holotape in the Overseers Office. This is a little anticlimactic, however. Let's put one finishing touch on this quest.
Open VT74 again, then the "Quest Stages" tab. Select Stage 100 - we'll give the player a small experience point reward for completing this quest. Add "RewardXP 100" to the Result Script field. Now the player can complete the quest and receive a small reward, as shown in 2b.
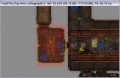
Fig 2a: Orthographic, Top Views with Grid Snap are very useful when scaling precise triggers.

Fig 2b: Adding a XP reward to the Quest Completion


That's it! You've completed your first quest, albeit a very basic one. Feel free to experiment with more complex quest logic, using the existing Fallout 3 quests as a guide.
Thanks for completing these tutorials. We wish you all the best of luck in your endeavors from here, and hope you'll share your creations with us and the rest of the Fallout 3 Modding Community!
The Bethesda Game Studios Team