Bethsoft Tutorial Optimization
Contents
Getting Started: Optimization
Overview
Objects are often rendered in games when they don't necessarily need to be, wasting precious performance.
For instance, if the player is in a room with walls on all sides, the player cannot see anything outside of the walls. Objects behind these walls don't need to rendered. While this seems obvious to us, game engines sometimes have a hard time making these decisions.
In order to help the game know to not render anything outside the walls, we have special tools available to us to optimize the room. Thanks to these tools the game can make smarter decisions about what to render and what to cull without having to perform complex line-of-sight and occlusion calculations. The tools we have available are Portals, Room Markers, Multibounds, and Occlusion Planes. In this tutorial, we are going to optimize our vault. Before we begin, lets briefly explain the tools we have at our disposal.
Optimizing Tools
Room Marker
A room marker is a box used to encapsulate objects you want to belong to that room marker. For example, say we made a room marker that surrounds a hallway. Inside that hallway we've placed a bunch of objects (chairs, tables, debris, etc). If we went in game and stood inside that hallway, we would see all of the objects. However, as soon as we stepped outside of the hallway, then all of the objects inside the room marker would be culled (disappear).
The boxes "A" and "B" in the diagram represent two Room Markers. The black dot is the player, and the shaded triangle illustrates the player's field of vision. Because the player is within Room Marker "A", only objects contained within "A" will render.

Portal
A portal connects two Room Markers together. Think of a portal as a doorway into a room marker. If there were two room markers next to each other with no portal in between, then we could not see the objects in the room markers unless we were inside them. If a portal were placed between them, then we could see the objects in each of the room markers, assuming we're looking through the connecting portal.
In the diagram to the right, the orange line labeled "a" represents a portal linking Room Markers "A" and "B". The portal "b" represents a portal to the the unbounded area. Because the a portal is within the player's field of view, the contents of both "A" and "B" will render. Because portal "b" cannot be seen by the player, objects beyond it will be not rendered (occluded).
Multibound
Similar to Room Markers, a multibound encapsulates a group of objects, which the occlusion system then treats as a single object for the purposes of rendering. If any part of the multibound is visible, all objects within are rendered. Multibounds are generally used in exteriors, and will not be covered in further detail for this tutorial.
Occlusion Plane
An occlusion plane is simply a primitive plane which tells the rendered to cull whatever objects are hidden behind it.
Step 1: Create Three Room Markers
Optimization Tutorial Video (part 1) at YouTube
In this tutorial we're going to optimize the first section of our vault using Room Markers and Portals. We will not be placing any Multibounds or Occlusion Planes.
We will be optimizing the area highlighted in green in the picture below.

Notice the highlighted section is basically made up of three large "rooms":
- The cave area
- The large room where the vault door is located
- The straight hallway with the stairs

Let's make a room marker for each of the three areas. Before we make our first room marker we need to do two things.
- Make sure Snap to Grid
 is turned on. This will ensure that our room markers and portals will snap together nicely.
 - Make sure Room Markers and Portals are not hidden. To check, go to View and click on Show/Hide. The Show/Hide dialog should pop up. Make sure Room Markers and Portals is checked. While we're at it, make sure the Multibounds and Occlusion Planes are checked too.
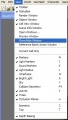
1a: Locating Show\Hide from the Main Toolbar
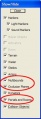
1b: The Show\Hide Dialog

If light radii are distracting in the render window, you can toggle them on/off with L. Likewise, you may wish to disable marker geometry with M.
Click the Room Marker icon ![]() on the tool bar to enter "Room Marker mode".
on the tool bar to enter "Room Marker mode".
![]()
When the icon is toggled on, you're in primitive drawing mode. Left Click and drag on any surface in the level to define the XY dimensions of the room marker. Release Left Click and move the mouse to set the Z dimension. Left Click again to finish the Room Marker.
Don't worry about getting it the right size, we will scale it to ours needs in a bit. You will automatically exit primitive drawing mode when the Room Marker is complete; a blue room marker should have been created, as pictured in fig 2a. Notice that my Room Marker is much too small to encompass the cave area.
For more specific information on how to create primitives (like a room marker), click here to read over the quick tutorial on that page.
You'll notice that you can only start to create a primitive if it's on a surface - basically anywhere except the void.
To scale, select the Room Marker and grab any of the directional gizmos by Left Clicking and dragging. There is a color-coded gizmo arrow for each axis. I've scaled my room marker to generally cover the cave area in fig 2b. Don't worry about getting anything exact just yet.
Fig 2c depicts the same room marker, but a different view to show you how much I scaled it on the Z-axis.
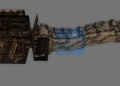
Fig 2a: Initial Room Marker before scaling
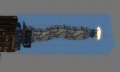
Fig 2b: Room Marker Scaled to Encompass Cave Area
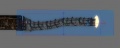
Fig 2c: Scaled Room Marker; notice vertical height


Now that we have one room marker encompassing the cave area, we need to make two more room markers, to cover the large room and the hallway.
Select the existing room marker and duplicate it with "CTRL-D". Move the new room marker and scale it to cover the room area of the vault. Repeat the process again to cover the hallway area. When you're done, you should have three room markers that cover the three major areas:cave, vault room, and hallway. Your room markers should look similar to the ones in the fig 3a below.
We need to snap each room marker to its neighboring room markers. Enter "Orthographic" View Mode by pressing "0" (zero). Press 'T' to go to Top-Down view. Everything should be on an orthographic view now - you may notice the lack of a vanishing point, giving your layout a very flat, clean appearance. Lining up room markers in this view makes precision much easier. Notice in fig 3b that my three room markers don't exactly line up with each other.
Perfectly aligned room edges are important, or you can end up with very small overlapping areas and/or gaps in which the game will not render correctly. These are notoriously difficult to find and debug, but can usually be avoided by good snapping habits at this stage.
So, make sure to scale each room marker to fit the dimensions of each area and make sure the edges of your room markers snap together. Make sure grid-snap is toggled on ![]() , and try to work with a fairly large grid size, to reduce the chance of mistakes. When you're finished, your three room markers should look like the ones in fig 3c below.
, and try to work with a fairly large grid size, to reduce the chance of mistakes. When you're finished, your three room markers should look like the ones in fig 3c below.
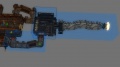
Fig 3a: Three Room Markers, roughly scaled
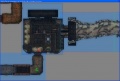
Fig 3b: Orthographic View reveals overlap
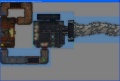
Fig 3c: Three scaled/snapped Room Markers


Step 2: Create Two Portals
Optimization Tutorial Video (part 2) at YouTube
Now that we have our room markers set up, we need to create portals between each room marker so the renderer understands how the rooms connect to each other.
Remember, portals allow us to see into a room maker and everything that's inside. If the player can see the portal, then that tells the game to render whatever is inside the room markers it's attached to.
Before we can create a portal, we need to do two things:
- Select a room marker
- Enter Portal Mode w/"CTRL+P" or

So, maneuver your camera close to the boundary between the room marker covering the cave area and the room marker covering the vault area. I have my camera set up here and have selected the room marker covering the cave area:

With the room marker selected, go into Portal Mode by toggling the Portal Mode Icon on.
![]()
Now that we're in Portal Mode with a room marker selected, we can create our portal. Click on the Portal Draw Icon.
![]()
Much like creating the room marker, Left-Click and Drag near the boundary of the two room markers to set your XY dimension, then Release and move your mouse to set the Z dimension. Once you have a desired height, Left Click again and you'll notice you now have a Portal, as in fig 4a below.
Notice the white line pointing from the portal to the room marker we had selected. This tells us that the portal has been "attached" to this room marker.
Try scaling your portals as small as possible so they just cover the viewable area (like a doorway). The bigger your portal is, the easier it will be for the game to see it and therefore render whatever is inside the neighboring room markers.
Likewise, be cautious not to make portals too small, or you could fool the renderer into not drawing rooms the player can plainly see into. Remember; it's better to draw a little bit more geometry than necessary than for the player's world to suddenly stop rendering at certain viewing angles.
The initial creation is rough, so we need to resize our Portal to cover the area where the player can see.
I've maneuvered my camera inside the level and scaled my portal just big enough that the edges extend outside the viewable area. This portal is fairly large because it is in a cave entrance. Most of your portals will be in doorways and therefore much smaller. So, go ahead and scale your portal to the size that you think is correct; it should look similar to fig 4b.
If your portal is rotated incorrectly and not flush with the room markers, simply double click the portal and change it's position. In our case, this portal should have a Z rotation of -90.
Before we move to the next step, select this portal and duplicate it. Move the new portal to the side of the level for now. I've duplicated mine and moved it to the side for now, as in Fig 4c.
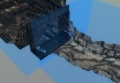
Fig 4a: A newly-created portal
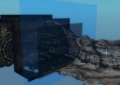
Fig 4b: Scaling the portal to span the cave mouth
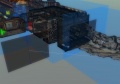
Fig 4c: Setting aside a duplicate portal


If you're having trouble selecting a portal, simply go into Portal Mode by selecting a Room Marker and pressing "CTRL+P" or
, and select your portal. When in Portal Mode, you can only select portals. This comes in handy when you have a lot of references blocking your view.
Step 3: Attach Portals to Room Markers
Now we have two portals, one lined up and another off to the side. We need to attach these portals to the room markers. First, let's line up the portal that we put off to the side.
Move it to the doorway between the vault entrance room and the hallway, as shown in fig 5a. You'll need to rotate it. You can toggle Snap Rotation on and rotate it that way or you can freely rotate it and change it's rotation properties by hand. But remember, portals need to be flush with room markers. Your portals will most likely have a Z rotation of 0, 90, -90, -180, or 180.
You'll notice that my portal still has a white line pointing to the cave room marker. Don't worry about that now, we'll take care of that in a bit. Right now, we need to scale our portal to fit the doorway. Go ahead and scale yours if you haven't done so already. Compare your portal to the one in 5b. (I've hidden the vault door so you can see my portal dimensions easier).
Now that we have our two portals in position, we need to attach them to the correct room markers. Let's start with the portal we just moved and rotated. Notice that the portal still has a white line pointing to the cave room marker. That means it is attached to that room marker. That is not what we want - that link is left over from our duplication.
We need to break the link. To do that, enter Portal Mode ![]() and select the portal we're working with. Once you have that portal selected, you need to toggle Portal Mode off
and select the portal we're working with. Once you have that portal selected, you need to toggle Portal Mode off ![]() . CTRL+Left-Click to select the cave room marker. So now you should have a portal AND the cave room marker selected, as in Fig 5c.
. CTRL+Left-Click to select the cave room marker. So now you should have a portal AND the cave room marker selected, as in Fig 5c.
To break the link, click the Break Portal Link Icon ![]() . The white line should disappear.
. The white line should disappear.
Now we need to select the portal again along with the hallway room marker. Remember; enter Portal Mode ![]() , select the portal, exit Portal Mode
, select the portal, exit Portal Mode ![]() , CTRL+Left-Click to select the hallway room marker. You should now have the portal and hallway room marker selected, as in fig 5d.
, CTRL+Left-Click to select the hallway room marker. You should now have the portal and hallway room marker selected, as in fig 5d.
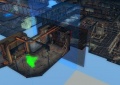
Fig 5a: Lining up a portal between Room Markers
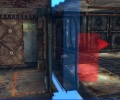
Fig 5b: White/blue line indicates portal link to room
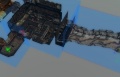
Fig 5c: Preparing to break a bad link.

Fig 5d: Preparing to link the hallway room to the appropriate portal


To create a link, simply press the Portal Link Icon ![]() . A white line should now appear from the portal to the hallway room marker, as in 6a below.
. A white line should now appear from the portal to the hallway room marker, as in 6a below.
Repeat the process and link the portal to the vault room marker. When you're finished, it should look like Fig 6b.
Notice that when you select a portal and a room marker and then link them, that you still have the portal and room marker selected. To speed up the process of linking the portal to other rooms, simply CTRL+Left-Click the selected hallway room marker. This removes that Room Marker from your selection. Now CTRL+Left-Click the vault room marker. Now all you need to do to create a link is to press the Portal Link Icon

Link the portal near the cave to the two adjacent room markers (the vault and cave room markers). When finished, you should have two portals and three room markers linked up, as in 6c. You can also get a clearer view of your room/portal connections by using "SHIFT+C" to hide all statics, then selecting all portals (made easier using the filter) to display link-lines. You can see an example of this technique in 6d.
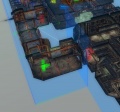
Fig 6a: Hallway Room & Portal Linked
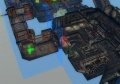
Fig 6b: Two links from the portal to adjacent
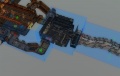
Fig 6c: White links show that our rooms/portals are all linked
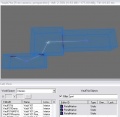
Fig 6d: Using SHIFT+C and selecting all portals is a useful debugging view for optimization


If you run through your level in game, you'll notice that when you get to the hallway room marker and open the door to the large, two story room, you cannot see it. All you will see is the void.
Once you introduce Room Markers, any area outside of a Room Marker is called the "Unbounded Space". The Unbounded Space can be thought of as a special Room Marker, and portals are still required when passing between this and any other Room Marker.
To fix this, select a portal, duplicate it, and drag it over to that doorway. Enter Portal Mode ![]() , select the portal near the hallway room marker (or you can create one from scratch and get some practice if you want) and use CTRL-D to duplicate it. Move it down to the doorway. Although the portal is already linked (white line) to the room marker, we should be safe and link it again.
, select the portal near the hallway room marker (or you can create one from scratch and get some practice if you want) and use CTRL-D to duplicate it. Move it down to the doorway. Although the portal is already linked (white line) to the room marker, we should be safe and link it again.
Linking a portal to a room marker will snap that portal to the face of the room marker so it's nice and flush with no gaps.
This is what your portal should look like when you're done.

Go in game and run through your level. You should now be able to see the large, two story vault room before you enter the doorway. Walk slowly when you know you are near portals, and try looking through them at as many angles as possible.
If you ever notice popping or your level all of a sudden disappearing when you're running through it, then there's a good chance your portals are not correctly snapped to your room markers or your portals may not be big enough. Simply go in and select the offending portals and snap them to their room markers again and see if that fixes it.
Once your level is optimized for maximum performance, you're ready to connect it to the world and begin sharing! Take a look at our next tutorial for more information on this.
General Advice for Optimization
Learning to work with portals and room markers will take some time and probably be frustrating at first. The more you go through the process of creating room markers and portals and linking them up, the better and faster you'll become. If you're serious about portaling a level, I urge you to go through this tutorial several times until you can do it without referencing it. It may seem like tedious work, but those who play your level will appreciate your attention to performance optimization and thank you for it - especially those with lower-end systems.
For an in-depth look at creating primitives for portals, room markers, triggers, etc click HERE
For a technical look at the occlusion culling system click HERE
Here are a few tips on how I approach the task of optimizing a level with portals and room markers.
(1) I create one room marker, then duplicate that room marker as many times as I need to cover my level to my satisfaction.
(2) I then go into orthographic view ('0' - zero) and go into top down view ('T') and align all of my room markers.
(3) Next, I create one portal. Then I duplicate that portal and break the link. This gives me a portal with no links that I can duplicate and move to other places in the level.
(4) Once I have all of my portals and room markers lined up I press SHIFT-C to hide all statics. All that remains in the render window is my room markers and portals. I then systematically go through and link all of my portals to their corresponding room markers. Once I'm done, I hit SHIFT-C again to unhide all statics and my level is now optimized.
(5) I then run through my level and take notes on where popping or my level disappears (if any) and go back into the GECK and quickly re-snap any offending portals to their room markers.
While optimizing a space is good practice, it is not always necessary for some spaces. If you do not have any performance issues with a space and do not want to optimize it, that's OK. You can skip this section on Optimization and move on to the next part of the tutorial. However, if you're planning on releasing a mod to the community, we recommend optimizing as much as possible. This will ensure that those with low-end machines can still enjoy your mod without suffering poor performance.
Remember that optimizing your level doesn't just help users with low-end machines. Beside making your level run at the highest framerate possible, good optimization helps to make your level future-proof. High-resolution texture mods, additional follower mods, and many other popular mod types can stress even powerful machines when loaded in tandem.
WARNING: Havok physics and the room markers do not play well together. Avoid placing Havokable objects near portals that they might be knocked through. [If an object is in, say, room A, then drawing of that object is restricted to people who are in room A, or who can see the object through a portal to room A. If the Havok engine causes the object to move (because the player picked it up with the Z key, or an explosion threw it) then the object will continue to be drawn so long as the object is in the motion under the control of the Havok system. However, once the object comes to rest, it is passed back to the normal renderer, and is once again drawn only for people in room A... even if it is now in room B. If you are in room B, with the object, it will be invisible to you.]