Bethsoft Tutorial GECK Setup
Contents
Download
Steam users: Tools section of your library.
GOG users: Included with the game.
Resources
- For the FNV GECK, download and install the GECK Extender from here.
- For the FO3 GECK, download and install the GECK Extender from here.
- NOTE Do not run the GECK with administrator privileges.
- NOTE Windows 7, users should run the GECK in Vista SP2 compatibility mode (unverified).
- NOTE Windows 8.1 and 10 users can use the keyboard shortcut "CTRL +" to expand condition controls which are hidden.
- You can download FO3Edit here.
- You can download FNVEdit here.
- Visit the Mod Tools section for additional modding tools and resources.
GECK INI Settings
In the [General] section of GECKCustom.ini the following settings are useful:
- Make statics in cells with roombounds visible by setting bUseMultibounds=0
- Allow loading plugins with multiple masters by setting bAllowMultipleMasterLoads=1
- Allow running multiple instances of GECK by setting bAllowMultipleEditors=1
- Allow unsafe saves (open dialogs) by setting bAllowUnsafeSave=1
- NOTE: If GECKCustom.ini doesn't exist, create one in the game's documents folder (Documents/MyGames/FalloutNV/GECKCustom.ini).
- NOTE: Mod Organizer users need to edit the file through the integrated INI editor.
Creating your mod
- Launch GECK.exe from your game folder or your mod manager if you are using one.
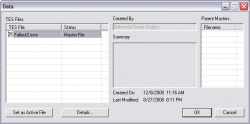
- From the main toolbar, open File>Data.
- Select "Fallout3.esm" or "FalloutNV.esm" by double clicking it and OK to load.
The loading speed depends on your hardware performance, mainly CPU. You can view the loading progress at the bottom of the GECK window.
- Once loaded, press save

- Because no active plugin is loaded, you'll be prompted to create a new plugin.
- Choose a name for your new file and additionally add".esm" at the end of your file name, eg: "Test.esm". This will create an ESM instead of an ESP with the proper extension and flag applied to the file header. Press OK to save.
If you're planning to move on to the other tutorials in this series, you might want to name your plugin "Vault74.esp". (ESM if you are using GECK Extender).
- Your changes will be saved to your active file. This will be your mod distributable.
- Multiple plugins may be loaded, but only one may be active.
- Close the GECK by going to File>Exit, and we'll learn how to load our new mod (.esm file)
Loading and testing your plugin
If you are not using a mod manager, you will find your newly created plugin in the game's Data folder, then you can enable it through the game launcher Data Files menu. If you are using Mod Organizer 2, all newly created files such as the plugin you just made will be sent to the Overwrite folder at the end of your modlist. From here you simply need to enable the plugin in the plugins tab and optionally move the plugin from Overwrite into its own mod in MO2.
There's not much point to running the game with your new plugin yet, however, since there's nothing in it. Let's fire up the GECK again and get started building our first Vault location.
