Heightmap Editing
Heightmap Editing allows you to generate a height map for the landscape in the world. Rather than hand editing landscape which is time consuming, this tool allows you to paint the heights onto a texture and generate the terrain based on what you've painted in.
It is strongly recommended that your computer meet or exceed recommended specification to use this.
Contents
Heightmap Editor
The Heightmap Editor allows you to generate a height map for the landscape in a world space. Rather than hand-editing landscape, which is time consuming, this tool allows you to paint the desired heights onto a 2D texture which the heightmap editor then converts to a 3D terrain mesh.
The heightmap editor is a high level tool suitable for massive landscape terrain alteration but with experience and the proper settings it can achieve a fairly fine degree of detail. With this program it is possible to create, sculpt, refine and even erode large sections of a landscape. Local, or high detail landscape editing functionality is still retained in the landscape editor.
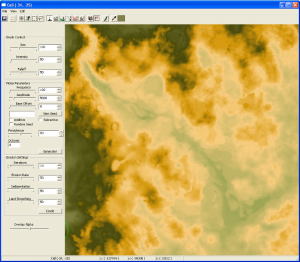
The Heightmap Editor window (accessible from the World/Heightmap Editing pull down menu in the main menu bar, or from the globe icon on the main editor toolbar) is divided up into 3 main sections: Editing Toolbar, Brush Parameters, and Editing Window.
It is strongly recommended that your computer meet or exceed recommended specification to use this.
Main Menu
The main menu and editing toolbar contain quick shortcuts to most of the basic heightmap editor functionality.
- File:
- Save allows the current state of the loaded heightmap to be saved to your plugin.
- ReLoad allows a prior saved-state of the loaded heightmap to be reloaded. Another good way to reload an earlier state is to refresh the current editing window by clicking on the corresponding heightmap section in the overview window.
- DeleteAllCells This option will flag all cells for that world space as deleted.
- Import This option allows you to use 1024x1024 16-bit RAW format images as a starting template for heightmap painting. These should be located in your "Data\HeightField" directory and named according to this grid (ex: Data\HeightField\0_0.raw). The files should also have been saved with these Raw Option settings: Header: 0, Non-interleaved Order, Count: 1, Depth: 16 Bits, Byte Order: IBM PC.
- Export This option allows you to export heightmap sections in 1024x1024 16-bit RAW format images. The files are created to the main Fallout 3 folder ("C:\Program Files\Bethesda Softworks\Fallout 3" with default installation) and named "Q1.raw" through "Q4.raw". These files can be opened in Photoshop with these Raw Option settings: Count: 1, Depth: 16 Bits, Byte Order: IBM PC. (Paint Shop Pro and the Gimp do not seem capable of handling 16bpp .raw files.) For those who cannot afford photoshop, ImageJ, a free photo editing software can open the raw files by importing RAW with the settings 16-Bit Signed and 1024x1024.
- Generate LOD This option is no longer supported in the GECK. Use the World LOD menu option from the World menu instead.
- Exit This option simply closes the Heightmap Editor.
- View:
- Show Overlay This option enables you to superimpose any 1024x1024 .JPG format overlay images on top of the heightmap editing window, to aid in painting. The opacity of the overlaid image is controlled via the Overlay Alpha slider under the erosion settings dialogue. The farther the slider is to the right, the more the overlay image is visible. The overlay feature is no longer supported.
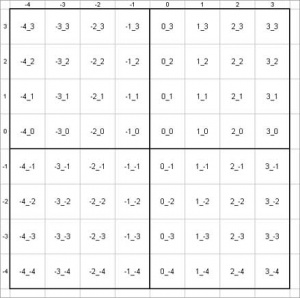
- Gridlines This toggles the grid line overlay on and off in the heightmap editing window. Each square represents one exterior cell.
- Color Masking This option brings up the color masking window.
- Overview This option toggles on and off the overview window.
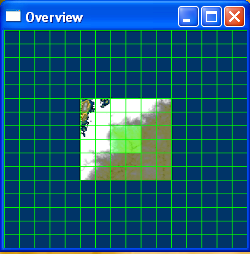
- Regenerate Overview This option will have the Heightmap Editor sequentially load each 1024x1024 section for a world space and compile a composite .JPG thumbnail image to be used in the overview window for navigation.
- Edit:
- Undo This option will allow you to undo the last few brush edits to the heightmap editing window. A handy alternative to the undo option is to refresh an unsaved heightmap section by reloading it via the overview window.
- Copy This option allows you to copy the raw pixels within any lasso/marquee shape currently drawn in the heightmap editing window into memory. The edit cursor will change to reflect the shape of the selection. Simply left-click to paste the desired pixels. A right-click will cancel out of the pasting mode. Shortcut: Ctrl-C
- Invert Selection This option will select the inverse of any pixels contained by lasso or marquee shapes in the heightmap editing window.
Editing Toolbar
Button descriptions left to right:
- Save This button saves the current state of the loaded heightmap section to your plugin.
- Undo This button will allow you to undo the last few brush edits to the heightmap editing window.
- Grid This button toggles the heightmap editing window cell grid overlay.
- Color Masking This button brings up the color masking window.
- Marquee This button allows you to draw a rectangular selection shape around specific pixels for more controlled heightmap editing, eroding, or for pixel copying.
- Lasso This button allows you to draw a curvilinear selection shape around specific pixels for more controlled heightmap editing, eroding, or for pixel copying.
- Flatten This button toggles a brush that will clamp all pixels inside the cursor to be the same color as the pixel directly under the cursor's center crosshair in the heightmap editing window. Shortcut: A
- Raise This button toggles a brush that will paint white to the pixels under the cursor in the heightmap editing window. With this brush selected, the left mouse button acts as raise, and the right mouse button acts as lower. Shortcut: S
- Lower This button toggles a brush that will paint black to the pixels under the cursor in the heightmap editing window. With this brush selected, the left mouse button acts as lower and the right mouse button acts as raise. Shortcut: D
- Smooth This button toggles a brush that will average the differences in color between the pixels under the cursor in the heightmap editing window. Shortcut: F
- Noise This button toggles a brush that will paint a mottled black and white pattern, as determined by the noise parameters, to the pixels under the cursor in the heightmap editing window. Shortcut: G
- Smudge This button toggles a brush that will intensely average the differences in color between the pixels under the cursor in the heightmap editing window. Shortcut: H
- Preview This button brings up the preview window.
- Overview This button toggles the display of the overview window.
- Paintbrush This button toggles a brush that will paint the currently selected color under the cursor in the heightmap editor window. Shortcut: B
- Eyedropper This button toggles a crosshair that will allow you to select the color of the pixel directly under the cursor. The currently selected color is indicated by the swatch next to the eyedropper icon.
Brush/Erosion Parameters
- Brush Control:
- Size Use the slider and/or the number field to change the size of any heightmap edit brush including flatten, raise, lower, smooth, noise, smudge, and paint. To quickly change the size of any current edit brush, press and hold either the Left Shift button or the Left Ctrl button while scrolling the middle mouse button to alter the brush size +/- one step at a time, or 10 steps at a time, respectively. Range: 1-300
- Intensity Use the intensity slider and/or the number field to alter the speed at which the current heightmap edit brush effect is applied to the heightmap. The higher the number, the more quickly the current brush alters the pixels within range of the cursor. Affects the flatten, raise, lower, smooth, noise, smudge, and paint brushes. Range: 0-4000
- Falloff Use the slider and/or the number field to alter the range (in pixels) at which the current edit brush will taper off towards the edge of the brush shape. The higher the number, the more gradual the effect will taper off towards the edge of the edit brush cursor. Affects the flatten, raise, lower, smooth, noise, smudge, and paint brushes. Range: 20-100
- Noise Parameters:
- Frequency Use the slider and/or the number field to alter the complexity or coarseness of the noise pattern. The higher the number, the more noisy and mottled the effect will be. Affects the noise brush and is taken into account via automated noise generation. Range: 1-10000
- Amplitude Use the slider and/or the number field to alter the maximum height range (black<->white) of the noise pattern. The greater the amplitude, the greater the contrast between the darkest (lowest) and brightest (highest) portions of the noise pattern. Affects the noise brush and is taken into account via automated noise generation. Range: 1-32000
- Base Offset Use the slider and/or the number field to set a clamp value, in units, for which the noise pattern is started from. The higher the value, the higher the elevation for which the noise pattern will generate. Affects only automated noise generation. Range: 1-32000
- New Seed Press the New Seed button to manually generate a new seeded value for the current noise function. The seed numbers are used to recall a particular set of results for the various characteristics that make up a randomly generated noise pattern. Use the neighboring number field to manually cut, copy, paste or enter in seed numbers. Range: 0 to ∞
- Additive Use this checkbox to ensure that automatically generated noise will only be added to, or raise the current heightmap pixels. Note that it is possible to have both the Additive and Subtractive checkboxes enabled at the same time. In this case, noise will be generated that can both raise and lower the heightmap pixels.
- Subtractive Use this checkbox to ensure that automatically generated noise will only be subtracted from, or lower the current heightmap pixels. Note that it is possible to have both the Additive and Subtractive checkboxes enabled at the same time. In this case, noise will be generated that can both raise and lower the heightmap pixels.
- Random Seed Enable this checkbox to ensure that a new, random seed number is used for each automatic noise generation pass.
- Persistence Use the slider and/or the number field to specify how the frequency value is modulated by the amplitude per each octave. Higher numbers usually equate to a noisier pattern. Affects only the noise brush. Range: 0-100
- Octaves This is the number of successive noise function passes involved in final noise generation. The higher the number, the more passes, or layers are involved in the noise generation and the more complex the pattern will appear. Affects only the noise brush. Range: 0 to ∞
- Generate! Use this button to automatically generate a noise pass onto the currently selected heightmap section. This button will take into account the frequency, amplitude, base offset, additive, subtractive, seed# and random seed parameters and flags. The area of generation can also be further controlled by the lasso and marquee selection tools.
- Erosion Settings:
- Iterations Use the slider and/or the number field to control how many steps or passes the Heightmap Editor will use when generating erosion. The higher the number, the more passes will be made allowing for more detailed erosion, and will greatly impact how long erosion generation will take. Range: 1-100
- Erosion Rate Use the slider and/or the number field to control how quickly the erosion process occurs during the generation pass. The higher the number, the more quickly and intensely surfaces will erode away from the starting shape. Range: 1-100
- Sedimentation Use the slider and/or the number field to control how much of the eroded land will deposit at the base of eroded gullies and canyons. The higher the number, the more land will be cut away and deposited at the base of eroded areas. Range: 1-100
- Land Smoothing Use the slider and/or the number field to control how smooth the heightmap will be after an erosion pass. The higher the number, the more that rough surfaces will be evened out and smoothed down during an erosion process, to better simulate weathering. Range: 1-100
- Erode Press this button to start an erosion pass based off of the iterations, erosion rate, sedimentation and land smoothing parameters. The area of erosion can also be further controlled by the lasso and marquee selection tools. By setting Erosion Rate and Sedimentation to 0 and only enabling Land Smoothing, this is also a quick way for smoothing the entire map, as opposed to using the Smooth or Smudge tools in the toolbar.
Editing/Overview/Preview/Color Masking Windows
- Editing Window This window displays the currently loaded heightmap section and allows for the various editing brushes to alter the pixels of 4 1024x1024 16-bit grayscale heightmap images. To navigate the window, press and hold the middle mouse button to pan around and scroll the mouse wheel up or down to zoom in and out, respectively. Note that the current cell coordinate and the XYZ positions, in units, of the pixel directly below the center of the current brush/cursor are displayed below the editing window.
- Overview Window This window shows a macro view of all editable heightmap sections for the currently loaded world space in a 16x16 grid. To switch focus in the editing window to a new heightmap section, simply click in the center of the 4 sections you wish to load, on the overview window. This is also useful if you would like to quickly reload or refresh the current 4 cells you are editing. The overview window can be toggled on and off via the overview icon on the toolbar, next to the camera icon, and can be resized and moved if desired. See the section on overview generation for more information on generating the overview window image.
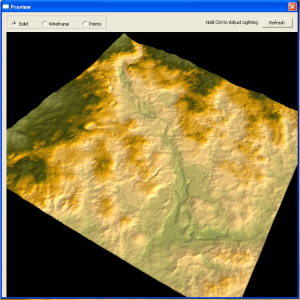
- Preview Window This window offers a 3D visualization for the currently selected heightmap section. To bring up the preview window, press the camera icon on the Heightmap Editor toolbar. To navigate around the preview window, press and hold the left mouse button while dragging to spin the landscape mesh inside the viewport. Press and hold the middle mouse button to zoom the view in and out. Press and hold the right mouse button to pan the landscape mesh laterally around the window. To quickly update or refresh the preview window after a heightmap change, press the Spacebar, or press the Refresh button. Holding down the Ctrl key while moving the mouse will adjust the point of origin for the preview window lightsource. Holding down the Left or Right Shift key while moving the mouse will update the position of the magenta scale reference character. This simple 3D box is a rough representation of a person, or 128 units of vertical height. The 3 radial buttons at the top of the preview will switch the viewport display between Solid, Wireframe and Points modes. The preview window can be resized and moved if desired. Note that the preview window will reflect the current selection within the loaded heightmap section. For a finer granularity (more accurate) preview mesh, try selecting a smaller section in the heightmap edit window with the marquee or lasso tools to preview. In order for the preview mesh to reflect this change, the preview window must be closed and re-opened so that the mesh can be redrawn to the new size.
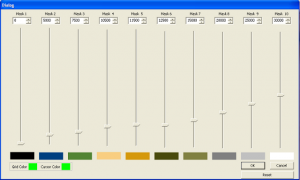
- Color Masking The color masking window allows the grayscale heightmap to be shaded in color, to better help visualize and spatially organize the height range of the heightmap editor. Through its interface, one can also filter and isolate specific height ranges to work in. To bring up the color masking window, press the color mask icon, between the grid and marquee icons, or choose it from the View pull-down menu. With the window open, you can see that there are 10 mask ranges - all of which can be individually scaled and adjusted to shade the pixels within the defined height range of that particular mask. To change the color for a mask, simply click on the swatches below the sliders to adjust the color respectively through the standard Windows color picker. The color mask system will specify that any pixel in the heightmap at that height, in units, will be shaded that color, and will interpolate smoothly to the next masking step above or below. For example, suppose you wanted to have all pixels below the water level be blue. You could simply set one masking level to be blue and to have a height value that is the same as the sea level. Set the next masking step to be one unit above the masking level, and to have a different color. There should now be a clear distinction on the heightmap of what is below and above the water line. It is also possible to use the color masking tool to temporarily prevent certain height ranges from being edited. In the previous example, you could block all pixels below the water level from being editable by making sure the minimum value for all of the 10 masks was at or above the water level height. This temporarily tells the editor that there are no alterable pixels below the specified height. Later, this height can be readjusted via the color masking to open it back up for editing. To set a height range for any mask, simply adjust the sliders or enter in a numerical value, in units, within the number fields above each mask. It is also possible to change the colors of the grid overlay and the edit cursor in this window by clicking on their respective swatches, and choosing a color through the Windows color picker. Press OK to accept the changes and close the color masking window. Press the Cancel button to discard any changes and close the color masking window. Press Reset to revert back to the default settings. Range: 0-65535
- Height Conversion It's important to know how the height units in the heightmap editor relate to the actual terrain elevation when the map is saved to the plugin. Water level (defaults to z=0 in exterior cells) corresponds to z=4096 on the height map. Moreover, all differences from this value are doubled in the generated terrain. For example, z=4196 doesn't give a terrain height of 100, but 200 instead. Following this formula, the default height in the heightmap editor (3072) results in an ocean depth of -2048 units.
Notes
- Mesh errors: The heightmap editor frequently creates some errors in the generated landscape mesh. These are most frequently located in cell 0,0 and the corners of each quad. These are rips in the mesh that cause errors when saving the esp. When you save it and get error messages about the CS being unable to create the mesh for a cell, write down the cell coordinates (don't hit "yes to all"). If you quit before fixing these errors, on reloading your mod the entire cell will be "missing" e.g. be set to elevation 0, which is hard to fix. To avoid this, load up the cells with errors in the Render Window, switch to wireframe view (w), and turn on the cell borders (b). Look around the edges of the cell (most often its the lower left corner), and if you find the anomaly, use the soften or flatten vertices tool to mend the mesh. In general, it is best to correct these errors with the local landscape editing tools as corrections done with the heightmap editor can re-introduce the same errors during the saving process - even after initially fixing them. This note refers to the Construction Set version of the editor. These errors no longer seem to occur with the GECK.
- Go easy!: It's very easy to overdo it with raising land, creating huge unnavigable mountain ranges instead of the nice hilly landscape you planned, especially when using the standard color masking options. Go easy when raising the land, keep the intensity low, and maybe adjust the color masking options to something more sensitive for the lower elevations.
- Raw files: The heightmap editor will automatically load any .raw files in your HeightField folder into the canvas window, so if you have been using .raw files and you want to work on a new heightmap that does not use .raw files you will have to remember to remove them to access your new heightmap.
- GECK Extender prevents out of memory crash when the landscape painting undo queue becomes too large.
See Also
- File:Heightmap Generation Tutorial Incomplete.7z A WIP (work-in-progress) tutorial on creating a worldspace heightmap from an external image (such as a USGS/United States Geological Survey LIDAR heightmap).
- File:Heightmap Tutorial Ashton.zip An addendum to the above tutorial with some additions (the above being a pdf was not readily editable)
